
Step 1: select sensor and files
Choose the sensor that produced the files. The dropdown shows all sensors registered in this project, formatted asname — manufacturer model.
Drag and drop your CSV files into the upload zone, or click to browse. Multiple files at once are supported.
If your sensor was created from the catalog, Chemolytic uses the built-in importer for that instrument’s raw file format.If your sensor is custom, your files must follow the Chemolytic standard CSV format (see below).
File requirements
Catalog sensor parsers
If your sensor was created from the catalog, just upload the raw files exported by your instrument software. Chemolytic detects the format from the sensor model and reads the file directly, no reformatting needed. The filename (without.csv) becomes the sample name.
If your sensor model is not in this table but your instrument exports a CSV that matches one of the standard layouts below, create a custom sensor and upload using one of those formats.
Standard CSV format (custom sensors)
Custom sensors accept two layouts. Chemolytic auto-detects which one your file uses.Long format (one row per data point)
Three columns by position. The first row may be a header (skipped automatically if not numeric).
A single file can contain multiple samples. Each sample is identified by its
sample_name. One row per data point per sample.
Wide format (one row per sample)
Header row starts with the literal wordname (case-insensitive) followed by the x-values. Each subsequent row is one sample: name in column 1, y-values in the remaining columns aligned with the header x-values.
Step 2: property extraction (optional)
If your filenames contain useful information about the samples (e.g.,oliveoil-batch12-arabica.csv), you can extract that information into sample properties automatically.
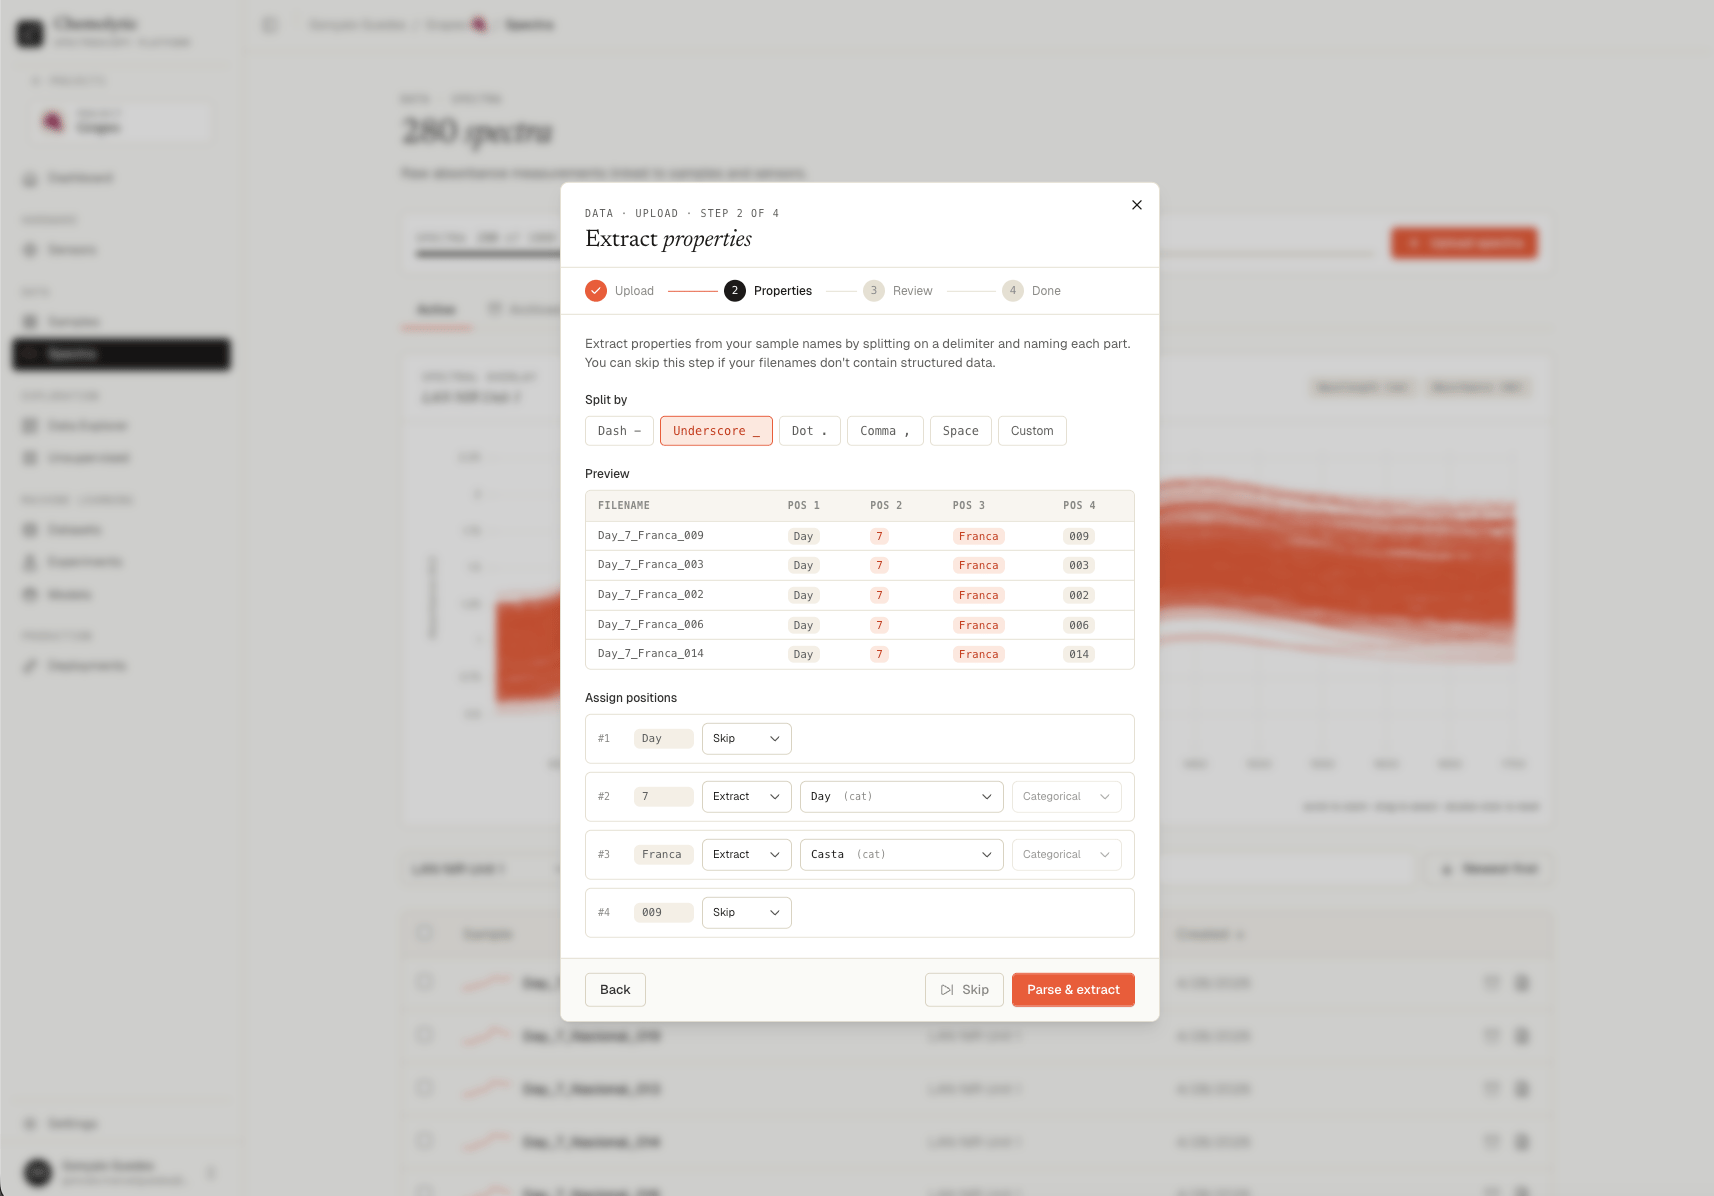
How extraction works
- Pick a delimiter that separates the parts of your filenames: dash (
-), underscore (_), dot (.), comma, space, or a custom character - Chemolytic splits each filename by the delimiter, showing every position in a preview table
- For each position, choose Skip or Extract
- For positions you extract, pick (or create) the property to fill, and set the type (Continuous or Categorical)
Example
For files namedoliveoil-batch12-arabica.csv and oliveoil-batch13-robusta.csv, with delimiter -:
This creates two new properties (Batch and Variety) and assigns the right value to each sample automatically.
Properties created during extraction follow the same rules as manually created properties. New property names must be alphanumeric (with underscores allowed). Categorical properties need at least 2 unique values across your files.
Errors at this step
Skip extraction
If your filenames don’t contain useful information, click Skip. Each file’s name (without.csv) becomes the sample name and that’s it.
Click Parse & extract (or Skip) to proceed.
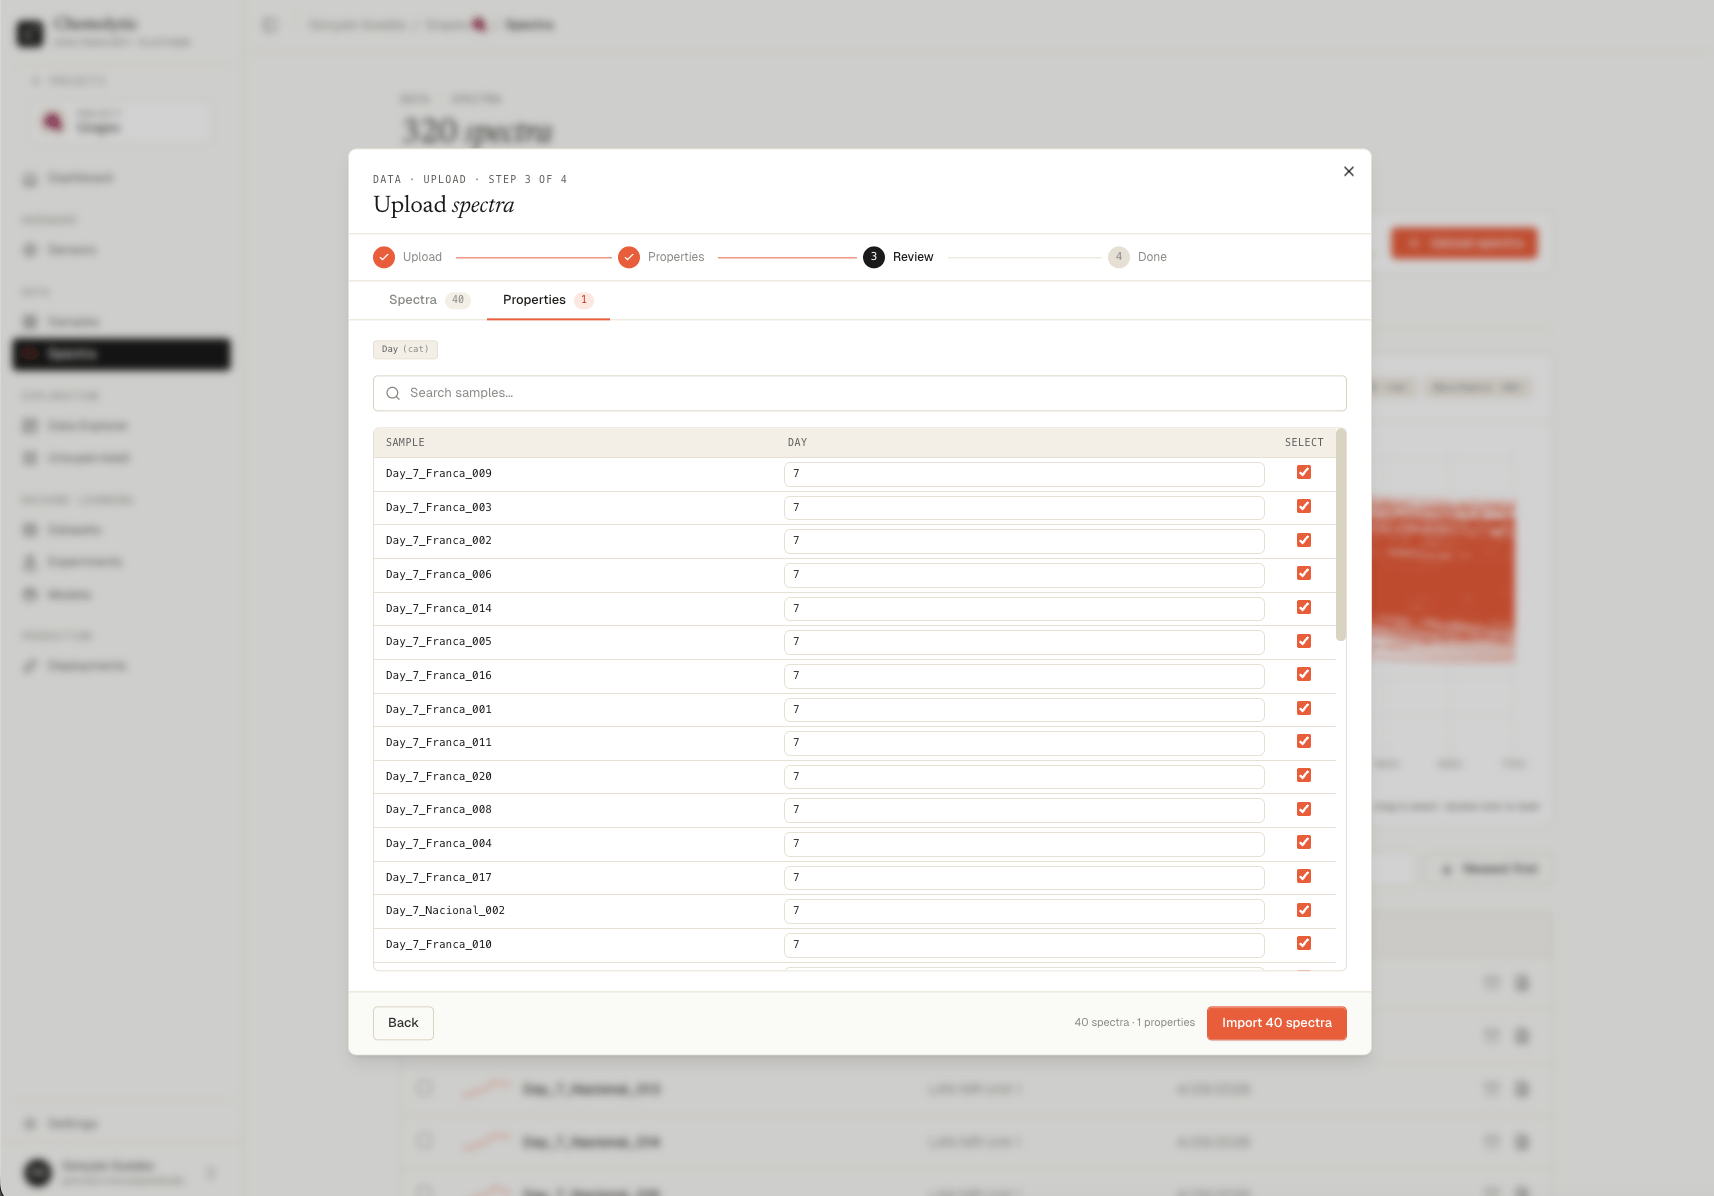
Step 3: review and select
The review step has two tabs.Properties tab
Shows the extracted property values for each sample. You can:- Edit any cell to fix incorrect extractions
- See warnings for samples where extraction failed (highlighted amber)
- Use the search box to find specific samples
- Select or deselect samples to import (checkbox per row)
Spectra tab
Shows the spectra chart with all parsed spectra overlaid, plus a chip per spectrum below.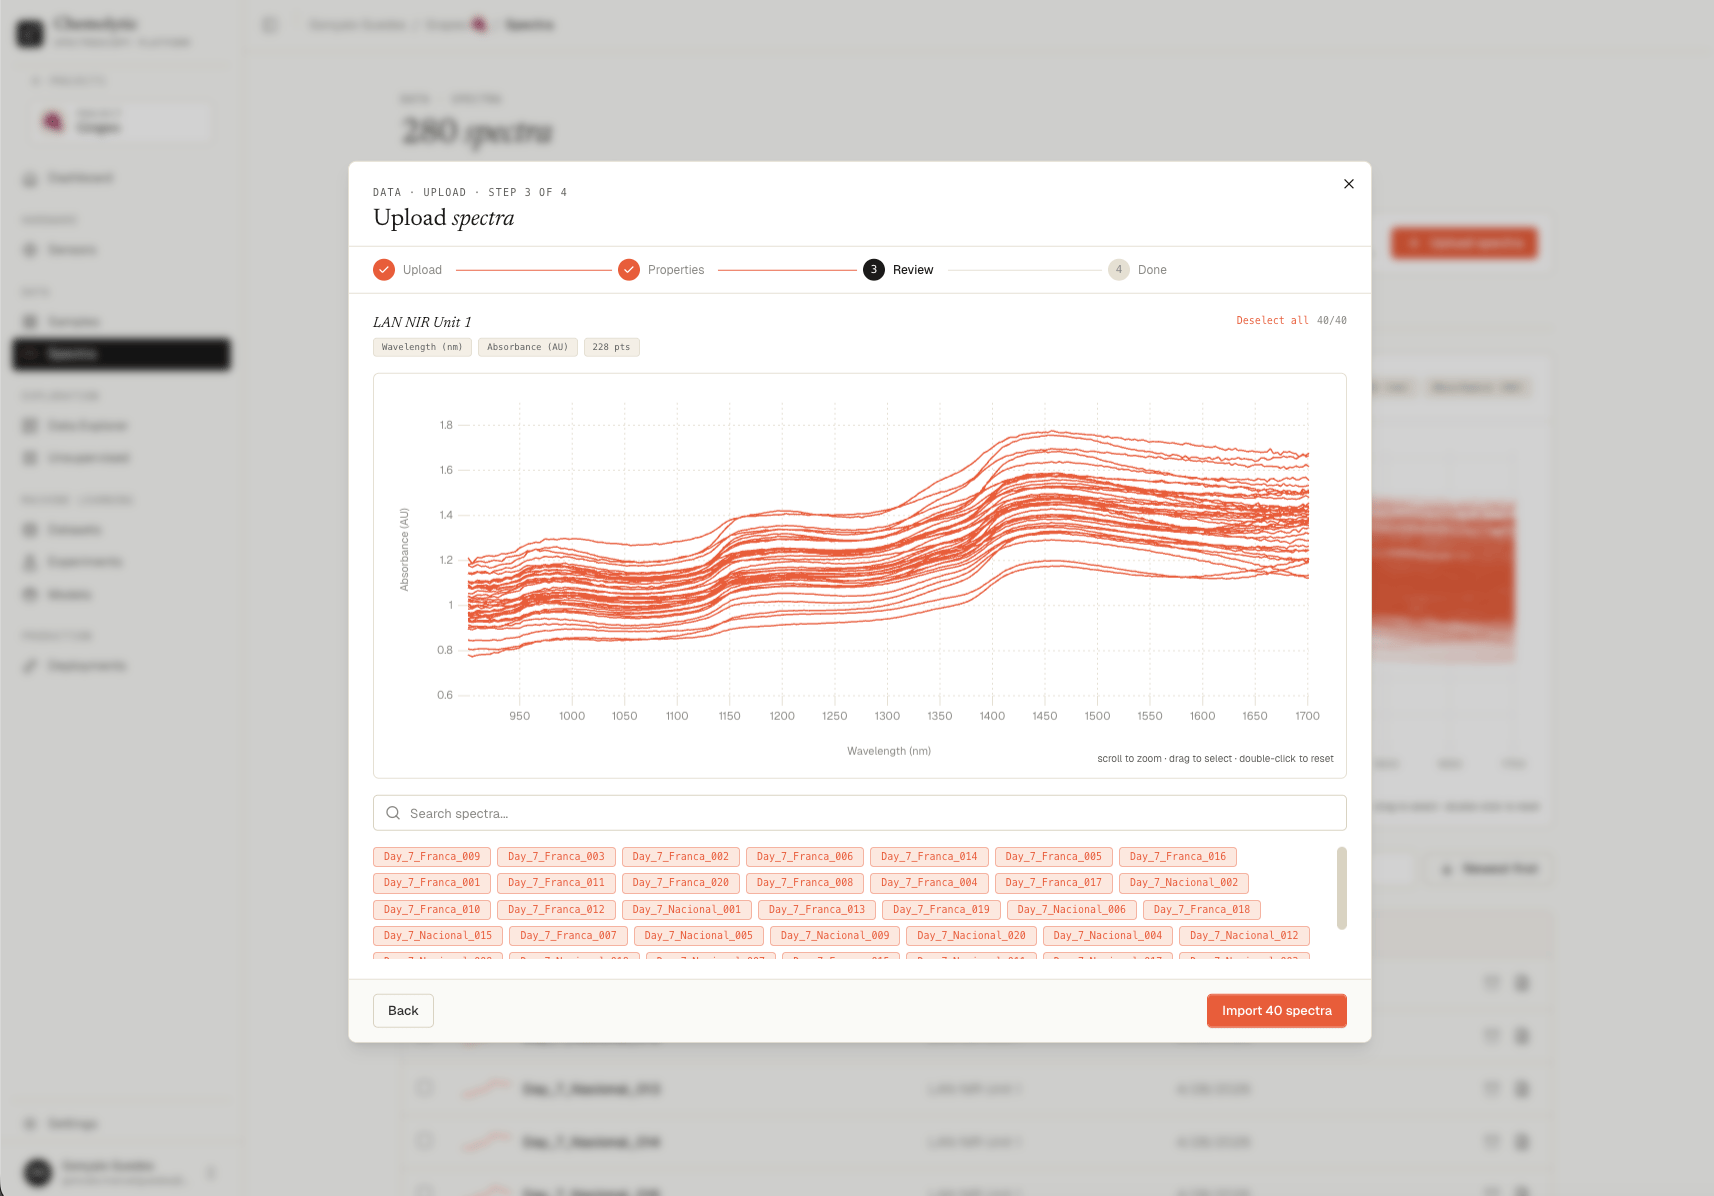
- Click a chip to deselect a spectrum (it shows strikethrough and is removed from the chart)
- Use Select all or Deselect all to bulk toggle
- Search by sample name
Errors at this step
Step 4: success
After import, you see a summary of everything that was created and linked.
Summary fields
Spectra created The total number of spectra saved to the project from this batch. This counts every file you imported, including replicas (multiple files for the same sample). Each spectrum is independently archivable and deletable. New samples Samples that did not exist before this upload and were auto-created. Chemolytic uses the filename (or thesample_name column for the standard CSV format) to determine the sample name. If a name doesn’t match an existing sample, a new one is created with no description and no property values (unless extracted at step 2).
Matched
Spectra whose sample name matched an existing sample in the project. The new spectra are linked to that sample as additional replicas. The existing sample’s description and other property values are not modified.
Properties
New sample properties created during the extraction step. Only appears if you used property extraction at step 2 and at least one new property was created. Existing properties are reused, not duplicated.
Targets
The total number of property-value pairs written to samples. One target = one (sample, property, value) triple. If a sample already had a value for that property, it is updated; otherwise a new target is created.
What happens next
Click Done to close the dialog and return to the Spectra page. The new spectra appear in the table immediately. You can now:- View any spectrum by clicking its row
- Filter by sensor to see the new spectra in the chart preview
- Continue to Building a dataset to use this data for training
Sensor x-axis lock
The first spectrum uploaded for a sensor sets that sensor’s x-axis (number of points and range). All subsequent uploads must match. If you upload a file with a different x-axis to an existing sensor, the parse step fails with one of the errors listed above. You have two options:- Fix the file (resample to match the sensor’s x-axis), or
- Create a new sensor for the different x-axis configuration