> ## Documentation Index
> Fetch the complete documentation index at: https://docs.chemolytic.com/llms.txt
> Use this file to discover all available pages before exploring further.
# Creating an experiment
> Pick a dataset, a target property, and a mode to start training.
Click **New Experiment** on the Experiments page.
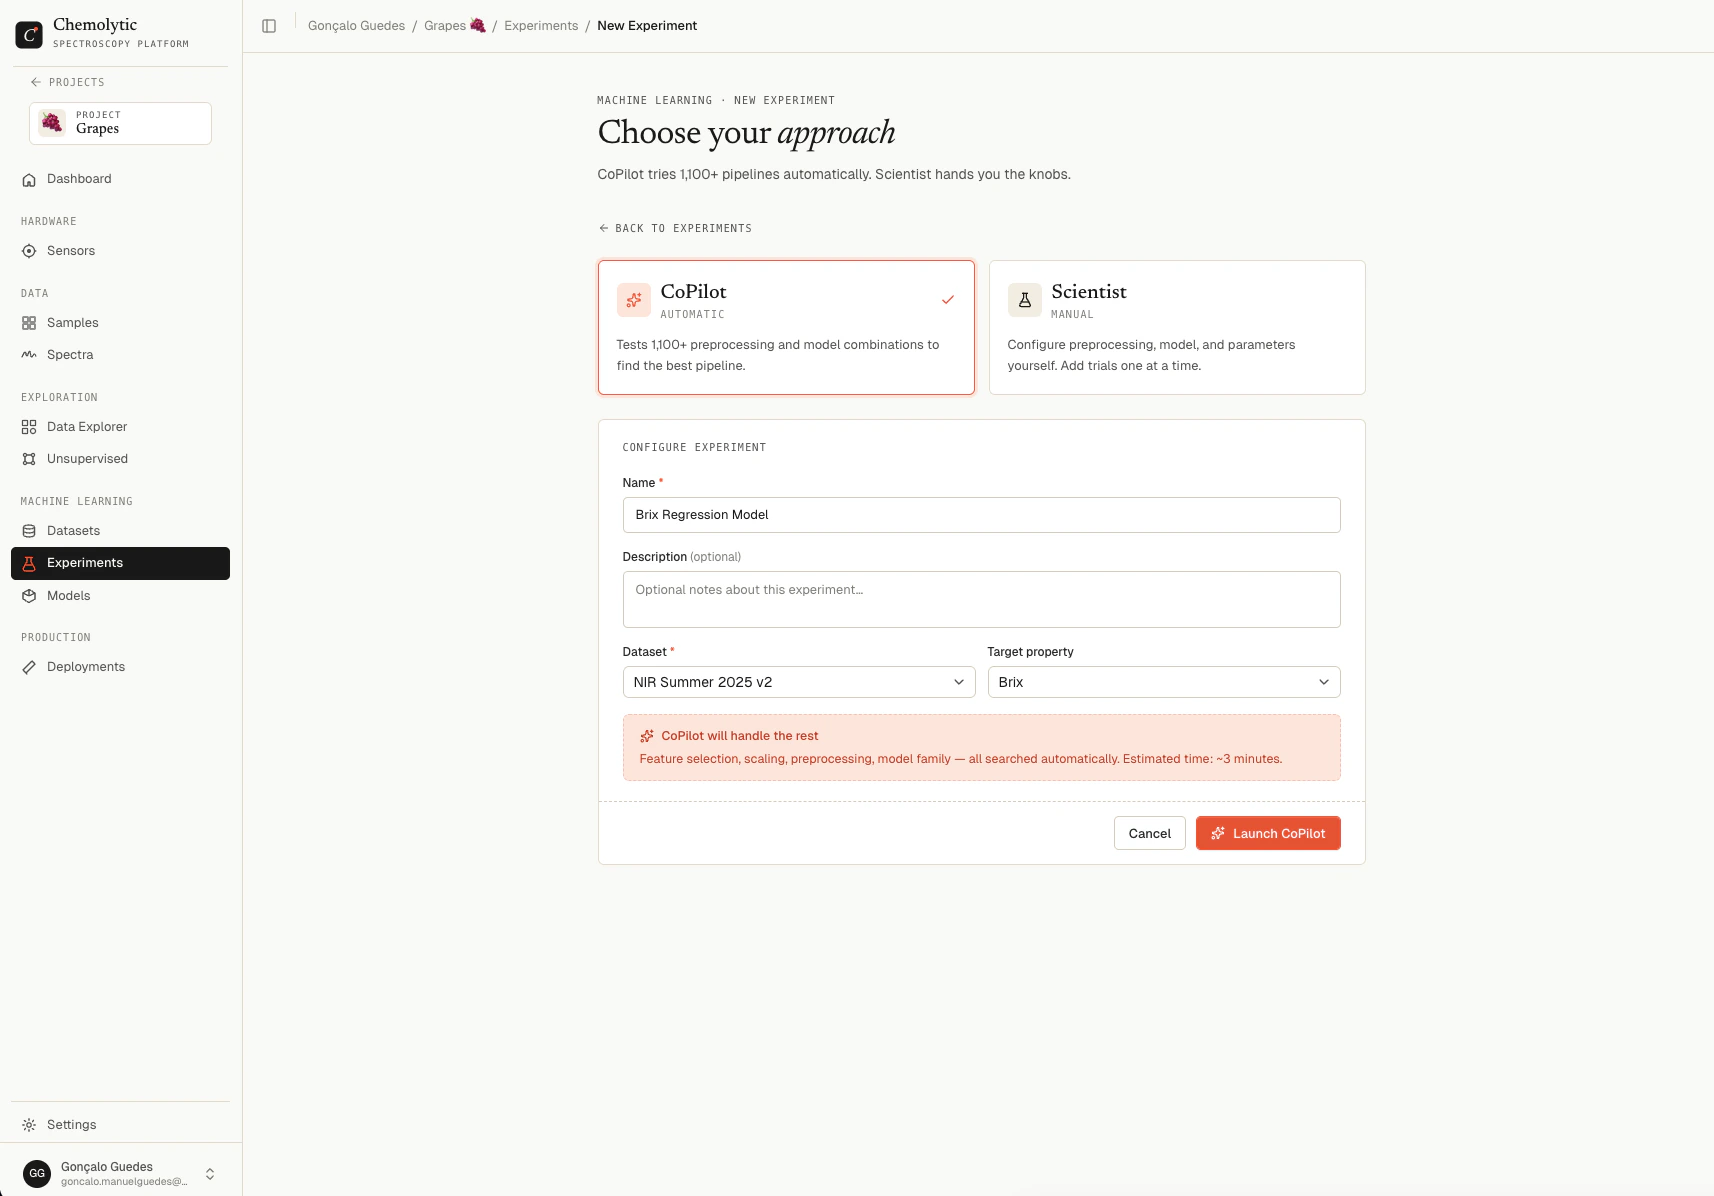 ## Step 1: pick a mode
The first decision is **CoPilot** or **Scientist**. Two cards at the top of the form.
### CoPilot
For when you want a working model fast and you don't need to tweak the recipe yourself.
* Tests 1000-3000 preprocessing + model combinations
* Uses Bayesian optimization to find the best one quickly
* Returns one best trial plus a leaderboard
* Estimated time: about 15-20 minutes for typical datasets
Pick CoPilot when you don't have strong opinions about preprocessing or model selection.
### Scientist
For when you want full control.
* You add **jobs** one at a time
* Each job is either a single trial (exact params) or a tuning job (search a parameter space)
* The experiment stays "active" indefinitely so you can keep adding jobs
* Uses your monthly Scientist jobs quota, not the CoPilot quota
Pick Scientist when you know the preprocessing and algorithm you want, or when you're benchmarking a specific approach.
## Step 2: fill in the form
After picking a mode, the rest of the form appears.
| Field | Required | Notes |
| ------------------- | -------- | ----------------------------------------------------------------------------------------------- |
| **Name** | Yes | Descriptive label, e.g., "Brix prediction v2" |
| **Description** | No | Free-text. Useful for noting hypotheses or constraints |
| **Dataset** | Yes | Pick from active datasets in the project |
| **Target property** | Yes | The property you want to predict. Filtered to those that have at least one value in the dataset |
The target property dropdown only fills in after you've picked a dataset, since the available properties depend on the dataset's snapshot.
Target properties with **all NaN values** in the dataset are hidden. If a property you expected isn't in the list, your samples don't have values for it, or those values aren't in the dataset's snapshot.
## Step 3: launch
Click the launch button at the bottom. The label changes based on mode:
| Mode | Button | Resulting status |
| --------- | -------------------- | ---------------------------------- |
| CoPilot | **Launch CoPilot** | Pending → Running → Done |
| Scientist | **Start experiment** | Active (waits for you to add jobs) |
You're redirected to the experiment's detail page. For CoPilot, training starts in the background and the page polls for live updates.
## Validation errors
The selected dataset is no longer available (it may have been deleted or archived). Refresh the page and pick another.
The dataset does not include this property. Check the dataset's Properties tab to see what's available, or create a new dataset that includes the property you need.
You've reached your monthly CoPilot or Scientist limit. Wait for the quota to reset (top of the Experiments page shows when), or upgrade your plan.
You need Contributor role or higher on the project to create experiments.
## Tips
**Use CoPilot first.** Even if you plan to use Scientist mode, run CoPilot once to see what preprocessing and models worked best. Use that as your starting point for hand-configured experiments.
**One target property per experiment.** Don't try to predict multiple properties at once. Create separate experiments for each, since the optimal preprocessing and model often differs by target.
**Pick a dataset version that matches what you'll predict on.** If your future predictions will come from new measurements, train on a recent dataset version that reflects current sample diversity.
## Step 1: pick a mode
The first decision is **CoPilot** or **Scientist**. Two cards at the top of the form.
### CoPilot
For when you want a working model fast and you don't need to tweak the recipe yourself.
* Tests 1000-3000 preprocessing + model combinations
* Uses Bayesian optimization to find the best one quickly
* Returns one best trial plus a leaderboard
* Estimated time: about 15-20 minutes for typical datasets
Pick CoPilot when you don't have strong opinions about preprocessing or model selection.
### Scientist
For when you want full control.
* You add **jobs** one at a time
* Each job is either a single trial (exact params) or a tuning job (search a parameter space)
* The experiment stays "active" indefinitely so you can keep adding jobs
* Uses your monthly Scientist jobs quota, not the CoPilot quota
Pick Scientist when you know the preprocessing and algorithm you want, or when you're benchmarking a specific approach.
## Step 2: fill in the form
After picking a mode, the rest of the form appears.
| Field | Required | Notes |
| ------------------- | -------- | ----------------------------------------------------------------------------------------------- |
| **Name** | Yes | Descriptive label, e.g., "Brix prediction v2" |
| **Description** | No | Free-text. Useful for noting hypotheses or constraints |
| **Dataset** | Yes | Pick from active datasets in the project |
| **Target property** | Yes | The property you want to predict. Filtered to those that have at least one value in the dataset |
The target property dropdown only fills in after you've picked a dataset, since the available properties depend on the dataset's snapshot.
Target properties with **all NaN values** in the dataset are hidden. If a property you expected isn't in the list, your samples don't have values for it, or those values aren't in the dataset's snapshot.
## Step 3: launch
Click the launch button at the bottom. The label changes based on mode:
| Mode | Button | Resulting status |
| --------- | -------------------- | ---------------------------------- |
| CoPilot | **Launch CoPilot** | Pending → Running → Done |
| Scientist | **Start experiment** | Active (waits for you to add jobs) |
You're redirected to the experiment's detail page. For CoPilot, training starts in the background and the page polls for live updates.
## Validation errors
The selected dataset is no longer available (it may have been deleted or archived). Refresh the page and pick another.
The dataset does not include this property. Check the dataset's Properties tab to see what's available, or create a new dataset that includes the property you need.
You've reached your monthly CoPilot or Scientist limit. Wait for the quota to reset (top of the Experiments page shows when), or upgrade your plan.
You need Contributor role or higher on the project to create experiments.
## Tips
**Use CoPilot first.** Even if you plan to use Scientist mode, run CoPilot once to see what preprocessing and models worked best. Use that as your starting point for hand-configured experiments.
**One target property per experiment.** Don't try to predict multiple properties at once. Create separate experiments for each, since the optimal preprocessing and model often differs by target.
**Pick a dataset version that matches what you'll predict on.** If your future predictions will come from new measurements, train on a recent dataset version that reflects current sample diversity.