> ## Documentation Index
> Fetch the complete documentation index at: https://docs.chemolytic.com/llms.txt
> Use this file to discover all available pages before exploring further.
# Samples and properties
> Understand what samples and properties are in Chemolytic and how they connect.
Samples and properties are the foundation of every model you build. Get these right and the rest of the workflow follows naturally.
## What is a sample?
A **sample** is a physical item you measured with a spectrometer. One bottle of olive oil, one soil core, one tablet, one grain batch.
Each sample has:
| Field | Description |
| --------------- | --------------------------------------------------------------------- |
| **Name** | A unique identifier within the project. Required, max 200 characters. |
| **Description** | Optional free-text notes (batch number, harvest date, source, etc.). |
| **Targets** | The measured values for each property. Optional. |
| **Spectra** | Spectroscopy measurements linked to this sample. Added separately. |
Sample names must be unique within a project. You cannot have two samples named "Sample-001" in the same project.
## What is a property?
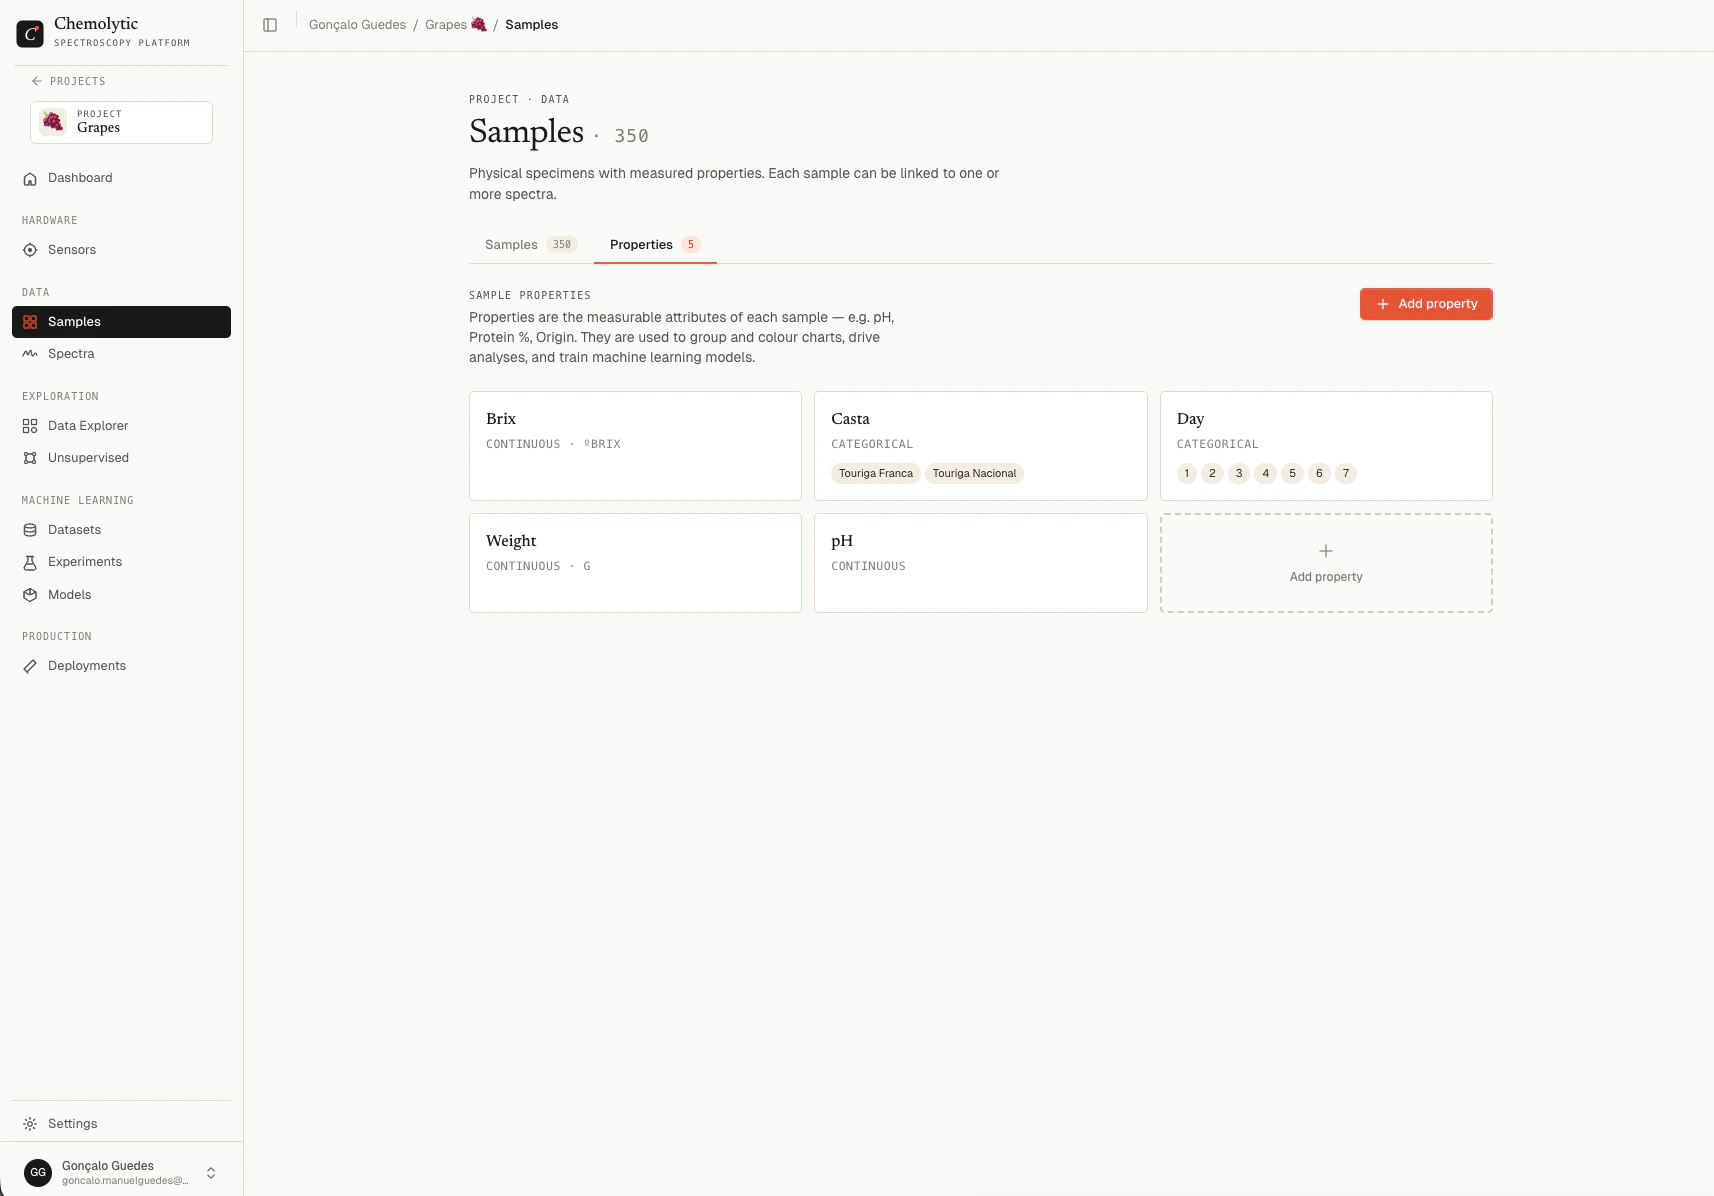
A **property** is a measurable attribute that you want to predict from spectra. Acidity. Protein content. Origin. Quality grade.
Properties are defined once at the project level. Every sample can then have a value for each property.
 ## Continuous vs categorical
Every property is either continuous or categorical. This decision determines whether you train a regression or classification model.
### Continuous properties
Numeric values on a scale.
| Examples | Unit |
| --------------------- | ----- |
| Moisture content | % |
| Protein concentration | mg/mL |
| Acidity | pH |
| Brix | °Bx |
| Density | g/cm³ |
Continuous properties produce **regression** models. The model predicts a number.
### Categorical properties
Discrete labels from a fixed list.
| Examples | Categories |
| ------------- | -------------------------- |
| Quality grade | A, B, C |
| Origin | Brazil, Colombia, Ethiopia |
| Pass/Fail | Pass, Fail |
| Variety | Arabica, Robusta |
Categorical properties produce **classification** models. The model predicts which category.
A categorical property must have **at least 2 categories**. If you have only one possible value, that's not a prediction problem.
## How samples and properties connect
A sample can have one value (called a **target**) for each property defined in the project. These connections are what enable model training.
```mermaid theme={null}
flowchart LR
P1[Property: Acidity] -.-> S1
P2[Property: Origin] -.-> S1
S1[Sample-001] --> T1[Acidity = 0.35]
S1 --> T2[Origin = Brazil]
S2[Sample-002] --> T3[Acidity = 0.42]
S2 --> T4[Origin = Colombia]
```
A sample can:
* Have values for all defined properties
* Have values for some properties only
* Have no property values at all (useful for samples you only want to measure but not train on yet)
## Order matters: define properties first
When you start a project, define your properties **before** adding samples. This way you can fill in property values as you add each sample, instead of going back later to update each one.
Go to **Samples → Properties** tab and create each property you want to predict.
Switch to the **Samples** tab. As you add samples, fill in property values.
Link spectra to existing samples (covered in [Uploading spectra](/data/uploading-spectra)).
## How many samples do I need?
There is no fixed minimum. Reliability depends on the diversity of your data and the difficulty of the prediction problem.
| Goal | Recommended sample count |
| ---------------------------------------------- | ------------------------ |
| Quick prototype, exploration | 20–50 |
| Production-ready regression model | 100–300 |
| Robust classification with multiple categories | 50+ samples per category |
The **diversity** of your samples matters more than the count. 100 samples spanning the full range of property values produces a better model than 1000 samples clustered in a narrow range.
## Continuous vs categorical
Every property is either continuous or categorical. This decision determines whether you train a regression or classification model.
### Continuous properties
Numeric values on a scale.
| Examples | Unit |
| --------------------- | ----- |
| Moisture content | % |
| Protein concentration | mg/mL |
| Acidity | pH |
| Brix | °Bx |
| Density | g/cm³ |
Continuous properties produce **regression** models. The model predicts a number.
### Categorical properties
Discrete labels from a fixed list.
| Examples | Categories |
| ------------- | -------------------------- |
| Quality grade | A, B, C |
| Origin | Brazil, Colombia, Ethiopia |
| Pass/Fail | Pass, Fail |
| Variety | Arabica, Robusta |
Categorical properties produce **classification** models. The model predicts which category.
A categorical property must have **at least 2 categories**. If you have only one possible value, that's not a prediction problem.
## How samples and properties connect
A sample can have one value (called a **target**) for each property defined in the project. These connections are what enable model training.
```mermaid theme={null}
flowchart LR
P1[Property: Acidity] -.-> S1
P2[Property: Origin] -.-> S1
S1[Sample-001] --> T1[Acidity = 0.35]
S1 --> T2[Origin = Brazil]
S2[Sample-002] --> T3[Acidity = 0.42]
S2 --> T4[Origin = Colombia]
```
A sample can:
* Have values for all defined properties
* Have values for some properties only
* Have no property values at all (useful for samples you only want to measure but not train on yet)
## Order matters: define properties first
When you start a project, define your properties **before** adding samples. This way you can fill in property values as you add each sample, instead of going back later to update each one.
Go to **Samples → Properties** tab and create each property you want to predict.
Switch to the **Samples** tab. As you add samples, fill in property values.
Link spectra to existing samples (covered in [Uploading spectra](/data/uploading-spectra)).
## How many samples do I need?
There is no fixed minimum. Reliability depends on the diversity of your data and the difficulty of the prediction problem.
| Goal | Recommended sample count |
| ---------------------------------------------- | ------------------------ |
| Quick prototype, exploration | 20–50 |
| Production-ready regression model | 100–300 |
| Robust classification with multiple categories | 50+ samples per category |
The **diversity** of your samples matters more than the count. 100 samples spanning the full range of property values produces a better model than 1000 samples clustered in a narrow range.